Contents
A quick overview
This project is my internship work in JdeRobot open source organization which develops a collection of exercises and challenges to learn robotics in a practical way. The exercises mainly based on ROS and Gazebo simulator. The organization develops software(ROS and Gazebo based exercises) with a main focus on educational impact on user who is keen on learning and testing different robotics algorithms for various scenarios.
For the user, this template comes with an ACE editor on which he/she writes algorithm in python and see simulation result.
By the time I joined the organization, they were primarily working on new release 2.3 which is migrating all the available exercises to new web-templates paradigm. I decided to take on one of those exercises which is Global Navigation and it was quiet challenging for the migration. Before I started, I studied their open sourced repository structure to better understand the source code.
Project references
Web Structure
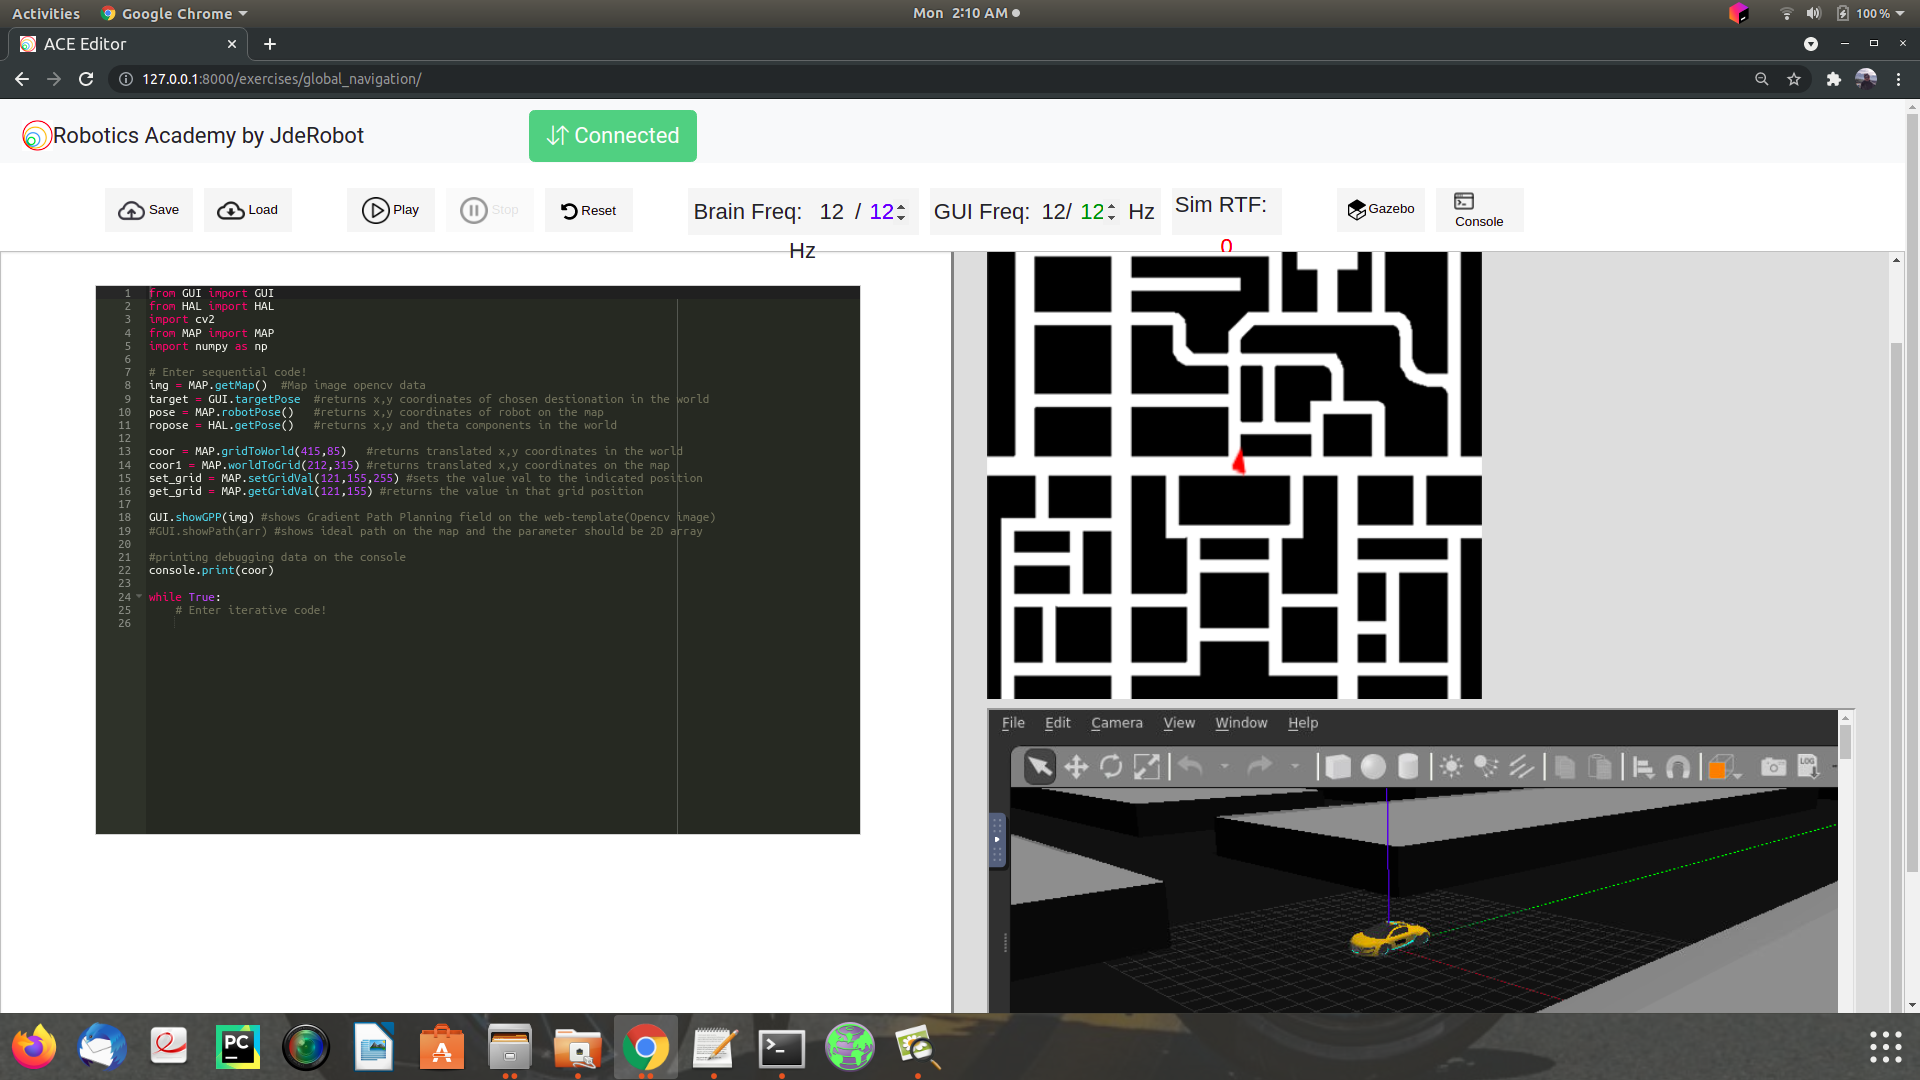
As one can see the thumbnail image, it is a single page localhost web-template contains :-
- ACE editor for the user to code particular algorithm in python
- Gzweb client simulation window + noVNC viewer in which the robot acts upon user’s algorithm
- VNC Console for debugged informations
- Control widgets such as play/stop/reset the simulation
- Map image with canvas robot position to locate it on the map
Design Architecture
Tools used
- ROS-melodic(LTS) - It is main framework used for simulation environment.
- Two websocket connections : GUI websocket for sending sensor data published from gzserver to gzweb (server to client), etc and Code websocket for user queries such as change in the sensor data, interfaces, etc (client to server).
- Two python theads : GUI thread for starting GUI websocket server and brain thread for Code websocket server along with their respective components.
- Docker : We built a docker image contains all the dependencies for running the exercise and use it as server side to maintain minimal installation and set up a ready working environment for the user with a single command line. It is :-
docker run -it -p 8080:8080 -p 2303:2303 -p 1905:1905 -p 8765:8765 -p 6080:6080 -p 1108:1108 jderobot/robotics-academy python3.8 manager.py- Port 8080 for Gzweb
- Port 2303 for GUI websocket
- Port 1905 for Code websocket
- Port 8765 for manager.py for setting up ROS environment for specific chosen exercise
- Port 6080 for vnc viewer for Gazebo
- Port 1108 for vnc viewer for console
Working principle on server side
Launch and world files
- It is suggested to run the launch file headless to be able to run Gzweb. Since the docker container handles a bundle of dependencies, running Gazebo GUI window inside the docker will consume too much CPU power.
- By launching it, only gzserver will be running behind the scene along with master node and other nodes.
Gazebo Models
- The gazebo models are taxi_holo_ROS and cityLarge that are come preinstalled with JdeRobot academy software. Since they come preinstalled, I simply got nothing to do with for using them.
- And they are loaded from CustomRobots repo by the docker image.
HAL.py (hardware abstratcion layer)
- From the master node, I take only two neccessary topics which are
/taxi_holo/odomfor the user to know robot position and/taxi_holo/cmd_velfor the user to override the linear and angular velocities. - I subscribed to
/taxi_holo/odomso that user gets updated robot position messages continously and published/taxi_holo/cmd_veland setting up linear and angular velocities to zero so that user can override any values they want to the message.
map.py
- Map with robot location provided on the template to monitor the robot.
- I extracted x,y coordinates and yaw (angle of rotation plane) from
/taxi_holo/odomtopic fromHAL classand converted them from world coordinates to map coordinates and used them on canvas element. - Some components are needed to be translated from world coordinates to map coordinates and vice-versa. For those, created built-in modules which do the function for the user. For all the built-in modules details, please refer Ref 1
gui.py (GUI thread)
- In this, the GUI thread will be started that runs GUI websocket server.
- The components in this thread are measuring the frequency of it, sending built-in modules functions called by the user on the socket such as robot position parsed by
MAP class, user’s debugged image which is GPP(Gradient Path Planning) and in CvMat form, 2D array points to show shortest path decided from path planning on the map, etc.
exercise.py (main launching file)(brain thread)
- Whenever user clicks widgets, the server gets the response from client and controls the simulations accordingly.
- The user code is sent to this websocket and executed using
exec()function. - All the accessible built-in APIs are created for the user to use dynamically on the editor in
exec()func. With the built modules as globals and empty dictionary as locals. - And the brain thread will be started when the user clicks
playbutton and the code in the editor will be executed.
